Ever wondered about the secret sauce to revamping your living space without breaking the bank? It’s simpler than you think: mastering how to make a recliner chair cover can breathe new life into your favorite cozy spot. Beyond just shielding your cherished recliner from spills and wear, a bespoke recliner chair cover adds a layer of sophistication and personality that off-the-shelf covers can’t match. Custom-made covers not only ensure a glove-like fit but also open up a world of personalization options to mirror your unique style.
Table of Contents
Why Custom-Made Covers Are a Game-Changer
Imagine walking into a room and seeing a recliner that looks like it leaped straight out of a design magazine, perfectly echoing the room’s vibe. That’s the magic of custom-made covers. They hug every curve and corner of your recliner, ensuring that sleek, tailored look that store-bought ones can seldom achieve. Plus, picking out your fabric means you get to play designer, choosing from a vast spectrum of colors and textures to find the perfect match for your décor and lifestyle needs. Whether it’s creating a kid-friendly space or adding a touch of luxury with velvety textures, the customization options are endless.
Understanding Your Recliner Chair
Before diving into fabrics and patterns, getting up close and personal with your recliner is crucial. Recliners come in all shapes and sizes, from the traditional rocker recliners, which are perfect for those soothing back-and-forth motions, to power recliners that offer the ultimate comfort with the touch of a button. Then there are swivel recliners, which add a 360-degree twist to your relaxation. Knowing your recliner’s type not only aids in selecting the right fabric but also in designing a cover that accommodates its unique functionalities.
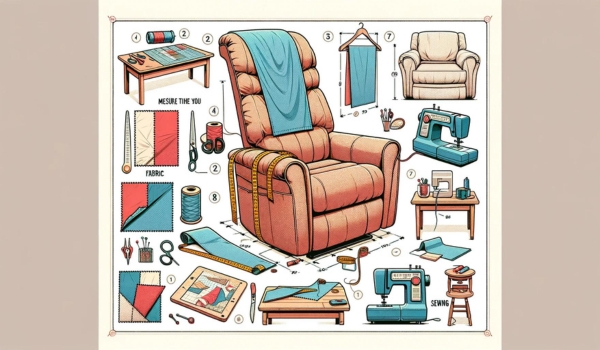
Measuring Your Recliner for That Perfect Fit
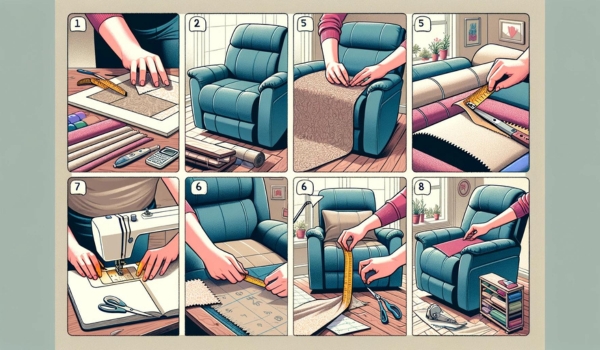
The first step in creating a tailor-made recliner chair cover is to take accurate measurements. This might sound like a chore, but it’s simpler than piecing together a puzzle. You’ll need to measure the height, width, and depth of your chair, not forgetting the dimensions of the armrests and the back. A pro tip here is to measure twice to cut once, ensuring your cover will fit like a glove.
Zooming in on Special Features
Recliners often come with gadgets and gizmos aplenty, like levers for reclining or buttons for electronic features. These functional elements require special attention during the cover-making process. Designing your cover with these in mind ensures that using your recliner remains a breeze, without any fabric getting in the way of comfort and functionality.
Materials and Tools Needed
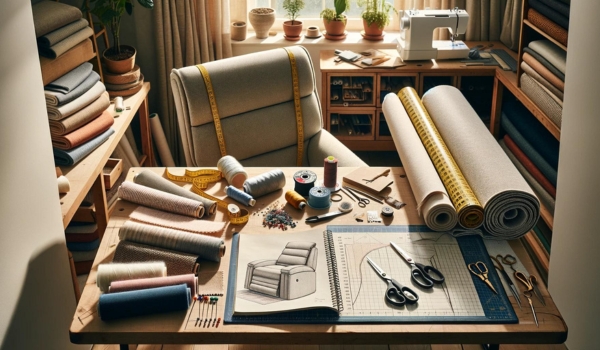
Diving into the world of DIY and crafting a recliner chair cover requires a mix of the right materials and a sprinkle of creativity. Let’s chat about the essentials. First up, fabric selection is not just about picking pretty patterns (although that’s a big part of the fun). You need to consider durability, comfort, and how easy it is to toss in the wash. Think along the lines of heavyweight cotton, canvas, or even microfiber for that snug feel and longevity.
Now, onto the toolbox. To bring your recliner chair cover to life, you’ll be buddies with a measuring tape, scissors, pins, and, of course, a sewing machine. Each tool plays its part in ensuring your creation fits like a glove. Additionally, don’t forget about the magic of elastic, Velcro, and zippers. These aren’t just add-ons; they’re the secret sauce to a functional and stylish cover.
Planning Your Project
Before you dive in, let’s pause and plan. Choosing a design sets the stage for your project. Are you leaning towards a slipcover that gracefully drapes over your chair, or are you eyeing a fitted cover that hugs every curve? Each has its charm, with slipcovers offering simplicity and flexibility, while fitted covers boast a tailored look.
Now, for the heart of DIY – creating your pattern. This is where you decide: to craft your path with a DIY pattern or to take a shortcut with pre-made patterns. Both roads lead to Rome, but crafting your own means your cover will reflect the unique dimensions and personality of your recliner. To craft a simple pattern, start by sketching your recliner, breaking it down into manageable sections like the back, seat, arms, and footrest.
Preparing your fabric is the next critical step. Before you cut, give your chosen fabric a good wash to pre-shrink it. This step saves you from the heartbreak of a shrunken cover after its first wash. After it’s clean and dry, lay it out, and with your pattern as a guide, begin the cutting process. This stage requires a mix of precision and patience, as it lays the foundation for your crafting journey.
Step-by-Step Sewing Guide
Embarking on the journey of creating a recliner chair cover, you’ve reached the exciting phase where the fabric meets the sewing machine. Let’s walk through this process, ensuring every step is clear and manageable.
Cutting the Fabric According to the Pattern
With your fabric prepped and your pattern at hand, the first task is to translate this blueprint into actual fabric pieces. Lay your fabric flat on a large surface, position your pattern pieces strategically to minimize waste, and begin cutting. Precision here is key to ensure that each piece perfectly aligns with the contours of your recliner.
Assembling the Pieces
The assembly process is where your project begins to take shape. Start by sewing the larger pieces together, typically the back and seat sections, before moving on to the smaller, more detailed areas like the armrests. Pinning the pieces together before sewing helps maintain alignment and eases the sewing process. Use a straight stitch for most of the assembly, but consider a zigzag stitch for areas that might experience more stretch to ensure durability.
Special Considerations for Complex Areas
Recliner chairs come with their unique challenges, such as armrests and recliner backs that might not conform to straightforward sewing techniques. For these areas, patience and a bit of ingenuity are required. Darts or pleats can be used to accommodate curves and ensure a snug fit. It’s also beneficial to do a fit test before sewing these pieces permanently.
Adding Closures for Ease of Use
Closures not only secure the cover in place but also facilitate easy removal for washing. Depending on your preference and the design of your recliner, choose from elastic bands, Velcro strips, or zippers. Elastic bands are perfect for areas that need to stretch over the chair, while Velcro and zippers offer a more tailored fit, making them ideal for the sides or back of the cover.
Hemming and Finishing Touches
The final touches are about hemming the edges for a clean, polished look. Double-fold the fabric edges and stitch, concealing raw edges for durability and aesthetic appeal. This step elevates the overall look of your cover, making it seem professionally made.
Customization Tips
Now, let’s dive into the fun part – customization. This is your opportunity to make your recliner chair cover truly yours.
Adding Decorative Elements
Whether it’s piping along the edges, quilting patterns for added texture, or embroidery for a personal touch, these elements can transform a simple cover into a statement piece. Each of these techniques adds depth and character to your cover, making it not just a protective layer but also a reflection of your style.
Incorporating Storage Solutions
Functionality meets style when you add storage solutions like side pockets or cup holders. Side pockets are perfect for stashing away remotes, magazines, or tablets, keeping them within reach but out of sight. Cup holders, on the other hand, can be a bit more challenging to incorporate but are a game-changer for those lazy weekends spent lounging.
Selecting and Applying Fabric Treatments for Stain Resistance
Lastly, consider treating your fabric with a stain-resistant treatment to keep your cover looking new for longer. This step is especially crucial if you’ve chosen a light-colored fabric or if your recliner is a popular spot for snacking. Various treatments can be applied at home, ensuring your cover is not only beautiful but also practical.
Maintenance and Care
When it comes to ensuring your newly crafted recliner chair cover stands the test of time, a little TLC goes a long way. Regular maintenance not only keeps it looking spick and span but also extends its lifespan. For starters, adhering to the best practices for cleaning your cover is crucial. Depending on the fabric you’ve chosen, this might mean machine washing on a gentle cycle or opting for hand washing to keep the fabric in top-notch condition.
But what about when your beloved recliner isn’t in use? Proper storage is key. Fold your cover neatly, and store it in a cool, dry place to prevent musty odors and to keep it ready for its next use. A little forethought here can keep your cover looking fresh and new for years to come.
Troubleshooting Common Issues
Even with the most meticulous planning and execution, hiccups can happen. Let’s tackle a couple of the usual suspects. If your cover ends up a tad too snug or too loose due to slightly off measurements, don’t fret. Small adjustments can be made by either taking in a bit more fabric or adding a panel to increase its size. It’s all about being resourceful and flexible with your solutions.
And what about the dreaded tear or damage? Before you throw in the towel, consider this an opportunity to flex your creative muscles. A well-placed patch, some strategic stitching, or even a decorative element can not only fix the issue but also add character to your cover. Think of it as your cover’s unique story unfolding.
Conclusion
Reflecting on our journey from the initial spark of inspiration to the final stitches of your recliner chair cover, it’s clear that this project is more than just a DIY task; it’s a labor of love. Each step, from selecting the right materials to adding those final touches, is imbued with a sense of personal achievement.
So, as we wrap up, remember that making a recliner chair cover is not just about protecting your furniture; it’s about infusing your space with a piece of your personality. Don’t shy away from experimenting with different designs, fabrics, and embellishments. Each cover is a canvas, and you’re the artist. Here’s to many more projects that reflect your unique style and creativity. Happy sewing!
Frequently Asked Questions
How do you cover a recliner seat?
To cover a recliner seat, measure the chair, select a suitable fabric, cut it based on your measurements, and sew it together according to the chair’s shape. Finish by fitting the cover over the seat and adjusting for a snug fit.
Can a recliner be slipcovered?
Yes, a recliner can be slipcovered. Choose a stretchy fabric for ease of use and ensure the slipcover is designed to accommodate the recliner’s moving parts for a proper fit.
How to make a cover for a chair?
Making a cover for a chair involves measuring the chair’s dimensions, choosing fabric, cutting the fabric to size, and sewing the pieces together. Ensure to account for any unique chair features.
Can we change the cover of the recliner?
Changing the cover of a recliner is possible. You can either make a new cover or buy a pre-made one. Ensure the new cover matches the recliner’s dimensions and design for a perfect fit.
Can you put a chair cover on a recliner?
Yes, you can put a chair cover on a recliner. It’s important to select a cover that is specifically designed for recliners to accommodate their moving parts and ensure a good fit.
Can you use a fitted sheet to cover a recliner?
Using a fitted sheet to cover a recliner is a quick and budget-friendly solution. While not perfect, it can provide a temporary cover that’s easy to put on and remove for washing.
Important Articles:
How to get a recliner chair through a door
How to measure a person for a recliner chair
How to move a recliner chair by yourself

Julie D. Williams is a seasoned chair connoisseur with a decade in the furniture realm. She combines her keen eye for design and deep knowledge of ergonomics to provide readers with reviews and guides, ensuring comfort and style in every recommendation. Each piece is a fusion of aesthetics and function, tested and approved by Julie. A believer in the power of the perfect seat to transform spaces, she’s your go-to source for impeccable finds. When not reviewing chairs, Julie is on the hunt for vintage décor, weaving comfort and beauty into every aspect of life.